Introduction
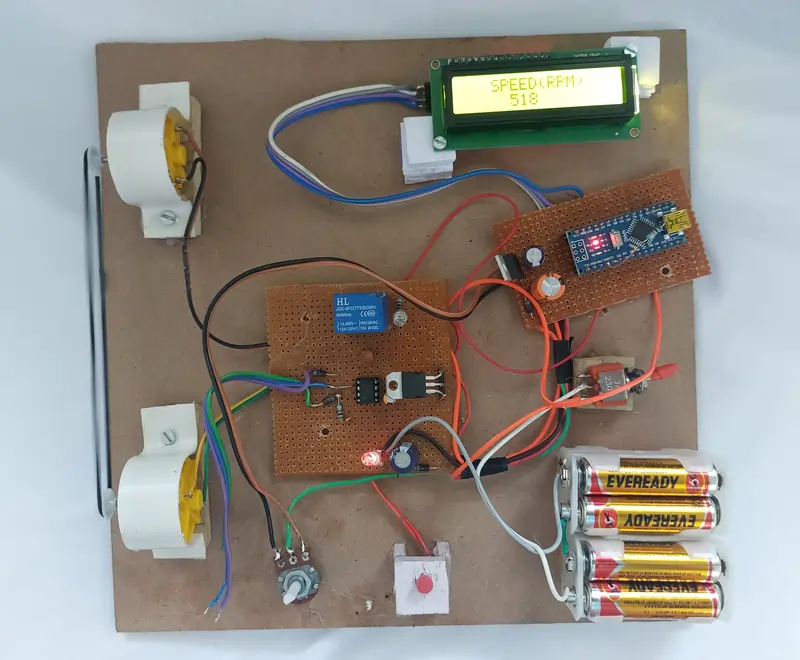
Are you an Arduino enthusiast looking for an engaging and practical project? Look no further! In this article, we will explore an Arduino-based project that combines RPM speed monitoring and brake indication using an eddy current brake system. By following the step-by-step instructions provided, you'll be able to create your own eddy current brake setup and integrate it with an LCD display for real-time monitoring. Let's dive in!
Arduino Projects: Eddy Current Brake System
An eddy current brake is a clever application of electromagnetic principles that allows for controlled braking of rotating machinery. By utilizing this technology with Arduino, we can create a versatile system capable of monitoring the RPM speed of a motor and indicating when the brake is applied, all displayed on an LCD screen.
Materials Required:
To start this project, you will need the following components:
Arduino board (such as Arduino Uno or Arduino Nano)
LCD display (16x2 or similar)
Eddy current brake system (including magnets, coils, and appropriate circuitry)
Rotary encoder
Jumper wires
Power supply
Step 1: Setting up the Hardware
Begin by connecting the Arduino board and LCD display as per their pin configurations. Use jumper wires to establish the necessary connections, ensuring the data and control pins are correctly assigned.v
Next, connect the rotary encoder to the Arduino board. This component will enable us to interact with the system and control the braking process. Follow the instructions provided with your rotary encoder for the specific wiring details.
Step 2: Eddy Current Brake Integration
Integrate the eddy current brake system with the Arduino. Connect the appropriate circuitry, including the coils and magnets, ensuring they are correctly aligned. The specific wiring will depend on the eddy current brake kit you are using, so refer to the provided instructions for guidance.
Step 3: Programming the Arduino
Now, it's time to program the Arduino to monitor the motor's RPM speed and display it on the LCD. You'll also need to implement the logic for brake indication when the braking process is initiated.
Utilize the Arduino IDE (Integrated Development Environment) to write the code for this project. The code will involve reading the RPM speed using the rotary encoder and displaying it on the LCD. Additionally, you'll need to incorporate the necessary logic to detect when the brake should be applied, triggering the appropriate indication on the LCD.
Remember to optimize your code for efficiency and reliability, ensuring smooth operation of the system.
Step 4: Testing and Calibration
Once you have uploaded the code to your Arduino board, power up the system and test its functionality. Adjust the parameters if necessary to ensure accurate RPM speed readings and reliable brake indication.
Application:
Industrial Machinery: The Arduino-based eddy current brake project finds extensive applications in industrial machinery, where controlled braking is crucial for the safety and efficiency of operations. It can be used in conveyor systems, rotating equipment, and production lines where precise control over braking is required.
Automotive Industry: This project can be applied to automotive testing and research environments. It allows engineers to simulate braking scenarios, monitor RPM speed, and analyze brake performance in a controlled setting. It can also be used for educational purposes in automotive training institutions.
Prototyping and Research: The project serves as an excellent tool for prototyping and research activities. It enables engineers and researchers to explore the principles of eddy current braking, motor control, and sensor integration. The flexibility of Arduino allows for quick iterations and experimentation.
Robotics and Automation: The Arduino-based eddy current brake project can be incorporated into robotics and automation systems to enable precise control over rotational speed and braking. This makes it suitable for applications such as robotic arms, autonomous vehicles, and drones, where controlled braking is essential.
Advantages:
Cost-Effective Solution: Arduino boards and components are affordable, making this project a cost-effective option for implementing RPM speed monitoring and brake indication systems. It provides an accessible solution for hobbyists, students, and small-scale projects.
Customizability: Arduino offers a user-friendly environment for programming and customization. Users can adapt the project to meet their specific requirements, modify the code, and expand its functionality. This flexibility allows for tailoring the project to suit various applications.
Real-Time Monitoring: The integration of an LCD display enables real-time monitoring of the motor's RPM speed. Users can easily visualize and track the speed changes, facilitating performance analysis and troubleshooting.
Enhanced Safety: The project enhances safety by providing a clear indication when the brake is applied. This feature is particularly valuable in scenarios where rapid braking or controlled deceleration is necessary, preventing accidents or damage to machinery.
Educational Value: The Arduino-based eddy current brake project offers significant educational value. It allows students and enthusiasts to learn about electromagnetism, motor control, sensor integration, and programming concepts in a hands-on manner. It fosters a deeper understanding of these principles through practical implementation.
Versatility: The project can be adapted to work with various types of motors, making it versatile for different applications. Whether it is a DC motor, stepper motor, or servo motor, the eddy current brake system can be integrated with the Arduino to control and monitor the speed.
Conclusion:
Congratulations on completing your Arduino-based eddy current brake project! You have successfully created a system that can monitor the RPM speed of a motor and indicate when the brake is applied, all presented on an LCD display. This project demonstrates the versatility and practicality of Arduino in various applications.
Arduino projects like this one provide an excellent opportunity to learn and experiment with electronics, programming, and automation. With the power of Arduino and your creativity, the possibilities are endless.
So, gather your materials, follow the steps outlined in this article, and embark on an exciting journey of Arduino-based projects. Enjoy the process of learning, creating, and expanding your skills in the fascinating world of Arduino!

